
Pacing strategy, especially in longer-distance races, is a tricky thing. How can you keep from going out too fast or lagging behind, and how do you ensure that you have enough gas left in the tank during those critical final miles? One way is to use a pace band.
A pace band is a strip of paper you affix to your wrist to help you keep your pacing on track during a race. For each mile of the course, it gives you the overall pace you’ll need to hold, plus the elapsed time when each mile should be completed. Used in conjunction with your running watch (because you have one of those, don’t you?), a pace band lets you know whether you need to speed up or slow down, and whether you’re on target to hit your goal.
While there are some websites out there that allow you to create pace bands for common, more popular races, the instructions below enable you to create a personal pacing aid for any race you’d ever want to run, regardless of course or distance.
Create (Free) Accounts
To get started, you’ll need to create accounts for yourself on two different websites:
- MapMyRun: www.mapmyrun.com
- PaceBand.org: paceband.org
In both cases, the account will be free. They’ll want to have your email address, at the very least. Feel free to subscribe or not to these sites’ email blasts.
Check for Your Race
The site paceband.org has plenty of races already loaded into the site. This is great if you’re planning to run Boston, say, or the Marine Corps Marathon. My favorite Southern Utah race, the St. George Marathon, is also a pre-loaded option. But smaller local races are mostly not in there. Here’s how to check to see if someone has already set up the race you’re running in the system:
- Go to paceband.org and log in to the account you created.
- Click on the “BUILD” button in the top, left corner of the screen. This takes you to the tool that allows you to generate a pace band.
- Select your distance (marathon, half marathon, etc.) and country.
- Click on the “Course” drop-down list. If your race is listed … hooray! You don’t have to do anything else. Skip down to Build Your Pace Band. If you don’t find your race on the list, you’ll need to create a custom course.

Create a Custom Course
If every course were nearly flat (like, say, the Chicago Marathon), all you’d have to do to create a pace band would be take your target time, divide by the number of miles and call it good. Unfortunately, that’s not the case with most races.
The paceband.org site requires a special file (with a .GPX extension) to analyze a course, factor in the ups and downs, and figure out what your pacing should be for each mile. The easiest way I’ve found to create a free GPX file is using mapmyrun.com.

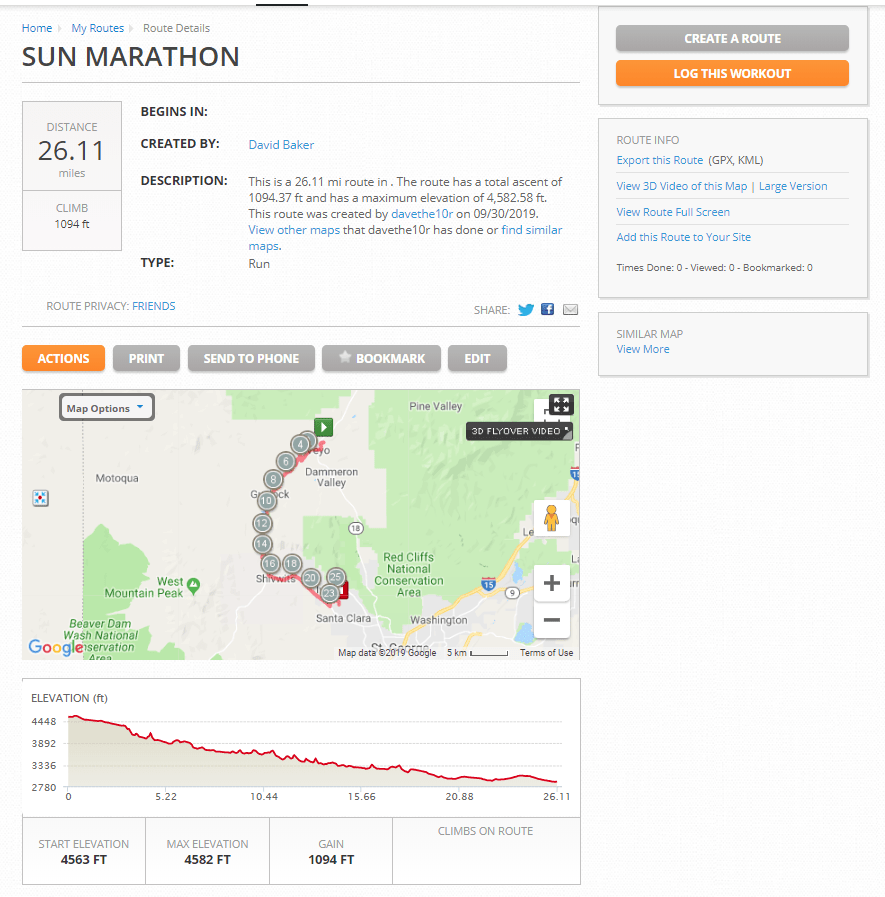
First, Google the race you’re running and find a map of the course. For my example, I’ll use the Sun Marathon, a local race here in Southern Utah that wasn’t already on paceband.org. (Here’s the course map for the full marathon, if you’d like to follow along.)
Once you have the official course map open in your browser, open a new tab or window and log in to mapmyrun.com. Find the “Routes” menu and select “Create Route.” This will take you to the interactive mapping tool you’ll use to create your course map.
- In the field labeled “Choose map location,” enter the city and state—or even an exact address—closest to where your course begins. (In the case of the Sun Marathon, it’s Veyo, Utah.) Then click the “SEARCH” button.

- The map should refresh and get you in the neighborhood of your starting point. Now, use the “[+]” and “[-]” controls to zoom in and out and click-drag the map to reposition it. If you accidentally begin your map without wanting to, back it out by clicking the “Undo” button. (For the Sun Marathon, the starting line is on Chad Ranch Rd., left-of-center of a rectangular area on the map that happens to be the town’s cemetery.)
- When you’re pretty sure you know where the starting location is, click on it. This will begin the map of your course.
- Using the course map as your guide, follow the route to the finish line, clicking along as you go. In most cases, using “Auto Follow Roads” is the best bet, but you may need to toggle that feature on and off if the course jumps from a road to a trail, for example. Make sure you end the course as close to the location of the actual finish line as you can get, based on the course map you’re copying. Don’t be afraid to “Undo” or even start over, if you need to.
- When you’re satisfied with your course map, select “Run” from the “Choose an Activity” menu and give it a name in the “Name this map” field.
- Click “SAVE ROUTE.” You’ll be sent to a summary page that shows a thumbnail of the map, the course elevation profile, and some other options.
- On the right side of the screen, click on “Export this Route.”
- A pop-up window will give you the option of exporting as a GPX or KML file. Click “DOWNLOAD GPX FILE” to save the file to your computer.
Import Your Custom Course
Now, go back to paceband.org and log in to your account.
- Click the “Courses” button to get to the list of your custom courses. Your list will be empty if this is the first time you’ve imported a custom course.
- On the “Courses – List” screen, click on the “Create Course” button. This will open a form that will allow you to enter information about the race you’re uploading. Fill in the fields as accurately as you can.
- Click on the “Browse” link and use the “Open File” dialog to locate the GPX file you downloaded from mapmyrun.com. Select the file and click “Open.”
- Click the “Add” button to create the course. It may take some time to import and save the file you uploaded.

On the far right side of the screen you’ll see two “Action” buttons. Click on the “Show” button (it looks like a blue eye) and then click on “BUILD my Pace Band.”
Build Your Pace Band
Now it’s time to configure your race strategy. Most people will select “Even Effort” over “Even Pace.” If you tend to start fast and get pooped toward the end, choose a fast start and slow finish. If you use a combination of running and walking, you can configure that as well. When you make a change, the website will automatically update the pace band mockup on the right side of the screen.

Once you have your pacing configured, you can print the band, create a PDF, or save your race so you can order a custom band from the company.
I actually prefer my own formatting, so I copy the pacing information and paste it into an Excel file I created (which allows me to add my race fuel plan to my custom band). I print the file on regular paper, cut it out, then “laminate” it by sandwiching it between two strips of packing tape. Then I just tape the band to my wrist on the morning of the race.

I hope this was helpful, and that you are able to use custom pace bands to hit your racing goals!